onsdag den 14. oktober 2015

Add blank space to an image in Mac Preview?

A hack on how to add empty/blank space to an image using Preview on Mac:
  1. Get the size in pixels of what you want the canvas to be
  2. Generate an image of that size here: https://placehold.it/{W}x{H} (e.g.https://placehold.it/350x1136)
  3. Copy the image (Control click, copy image)
  4. Open preview, press ⌘ command + N or File > New From Clipboard
  5. In the new image, select all (⌘ command + A) then hit delete
  6. Copy your original image(s) into your new canvas, reposition as needed
It's a hack, but it works. If you need anything more precise, then you'll probably need a proper photo editor.

This hack is found thanks to this source:
http://apple.stackexchange.com/questions/134713/can-you-add-blank-space-to-a-photo-in-mac-preview 

torsdag den 12. juni 2014

Cannot Delete Files in Trash on Mac!


Sometimes if the files are locked you cannot empty the trash can. Some files will simply not be deleted.
To solve this you can simply do this:

Hold down option/alt key and click Empty on the Finder menu


søndag den 16. marts 2014

Setup IMAP for Hotmail, Live Mail, and Outlook on Mac OS Mail

Microsoft has added IMAP support to it's different e-mail hosts (Outlook.com, Live, Hotmail etc.), which allows you to keep your e-mail synchronized when using third-party clients.
This is the same functionality as Google's Gmail which have been supporting IMAP for some years.
This tutorial will show you how to set your Microsoft Mail up and running with IMAP on Mac's Mail client.

Setup Microsoft mail on Mac's Mail


Step 1: Open Mail and add account
Click on Mail menu and select Add Account... 


Step 2: Choose Mail Account
Select Add Other Mail Account... and click Continue


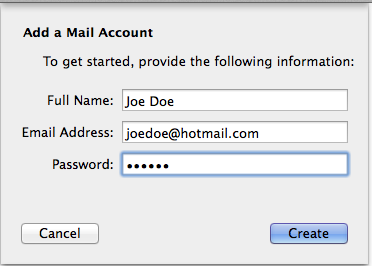
Step 3: Enter your information
Write your full name, email address and password and click Create

After you click Create it contacts the server and tell you that you should configure account manually.
Then just click Next


Step 4: IMAP for incoming server
Choose IMAP and enter IMAP information for incoming server: imap-mail.outlook.com 
Click Next


Click Next


Step 5: IMAP for outgoing server
Enter this information SMTP Server: smtp-mail.outlook.com


Then click Create and you're done! 

torsdag den 8. august 2013

Screenshot in BootCamp on Windows 7/8 (Macbook Pro)

This article/tutorial tells how to take screenshot with hotkeys on Boot Camp for windows 7 or 8.
Here is one of the shortcuts: Function(fn) + Shift + F11

Read More Here:
http://www.mactrast.com/2011/12/how-to-boot-camp-taking-screenshots-in-window-7-with-a-apple-keyboard/

søndag den 4. august 2013

Disable Automatic Brightness on Windows 8 Bootcamp

Here is a link that explains very well how to disable automatic/adaptive brightness on your Windows 8 running with BootCamp on Mac.

I had a problem with my display brightness that most of the time was dark even though the brightness was adjustet to the maximum. This article solved my problem:
http://www.howtogeek.com/107173/disable-windows-8s-adaptive-brightness-to-fix-dark-screen-problems/

søndag den 19. maj 2013

Tortoise SVN for Mac

This is a tutorial on how to install a Tortoise SVN client like application on mac.

NB: this application is from 2010 and is made for Mac OS Snow Leopard. Although it works perfectly fine on my machine running Mac OS Mountain Lion 10.8.3. I cannot guarantee that it will work on your version of mac nor that it will be bugfree. In my case I think it is the best free (and maybe the only) solution for running a fully working svn client integrated with finder. This client is a plugin called SCPlugin.

Install SCPlugin

For installing SCPlugin the first thing you have to do is to download the installation file: SCPlugin
When you have downloaded the file  - you just run the installation as you normally do - with normal mac os installations. You just have to run all the default setups - click Next without changing any settings.

When finish installing the plugin - open the Application folder and find SCToolbarButton:

Move SCToolbarButton up to the finder bar and now your are ready to go...

Using SCPlugin

SCPlugin is very simple to use - you just have to follow these steps:
  1. Create an empty folder - For example i created a folder called SVN_Folder on  the desktop:
  2. Open the folder
  3. Click on the SCPlugin icon and choose Checkout
  4. A new window opens and you just fill in the blanks with your SVN Repository URL, Usename and Password - Notice the screendump below - you have to check the Recursive checkbox.
  5. When you have filled the blanks, just click the Checkout  button and you are done ! 

Links